American RV motorhomes are complex machines and like any other complex machine, they need regular maintenance. When I say regular maintenance I don’t just refer to an oil and filter change, I am referring to a proper inspection from a group of qualified engineers.
The problem with American RV motorhomes is they are not very fuel efficient, some owners try to take the easy option which is to get them repaired and serviced at their local lorry workshop. Although the lorry/HGV/LGV engineers are qualified, they are not familiar with a lot of the American motorhomes equipment. They may be quite able to service or repair the engine but might struggle when inspecting the gas fridge or water boiler, would they know what product to use to re-seal the roof? I suppose one way of looking at it is that you could be paying someone to learn how to repair your American RV motorhome.
At LAS we pride ourselves on the fact that we have a tremendous amount of knowledge about American RV motorhomes and that in itself goes a long way in offering customers preventative maintenance and trouble-free RV’ing.
LAS work from a time evolved service sheet. When a potential problem arises more than once we can then monitor the situation, if a problem occurs more frequently then it will be included in the service.
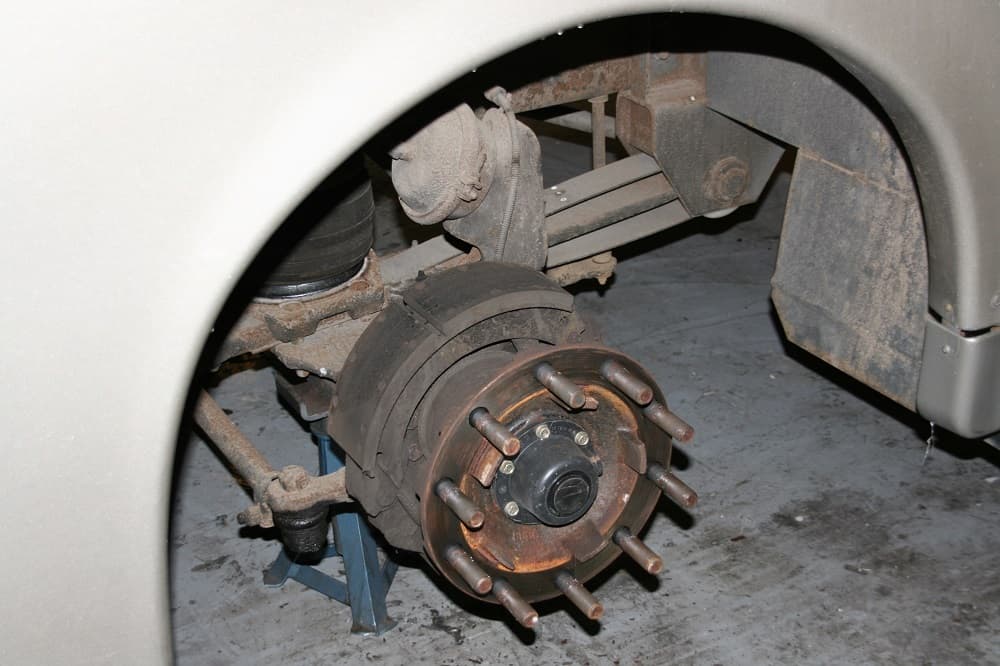
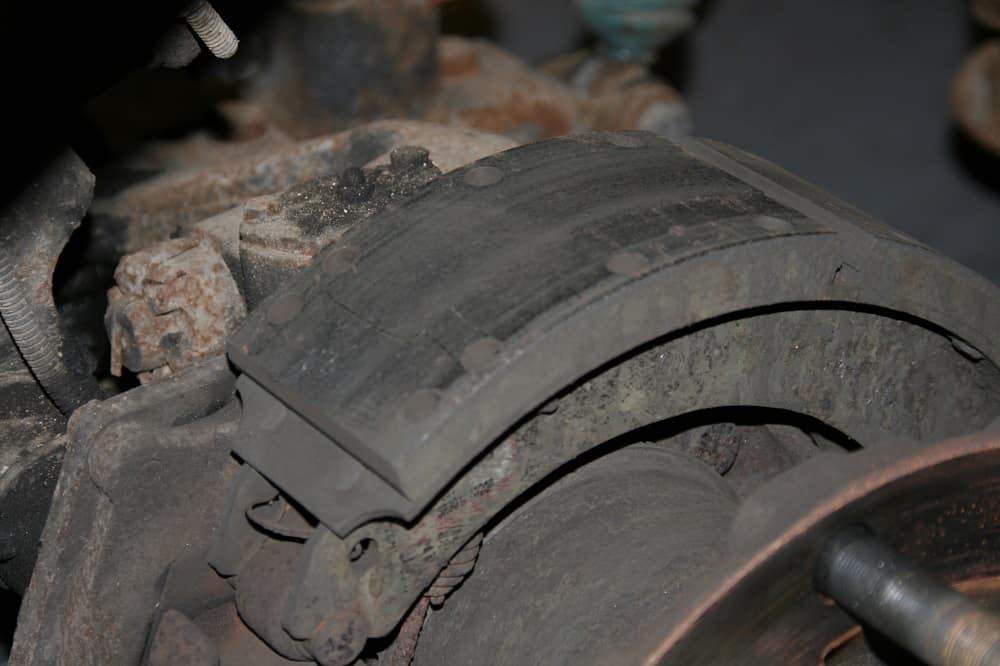
One operation that we included on our service sheet when it was devised was the removal of the road wheels, this was to enable us to gain access to the brake material. Most of the American RV motorhomes with the engine at the front have disc brakes, whilst the motorhomes with the engine at the rear have often got drum brakes. If when inspecting the motorhome we see a blue tinge colour to the brake disc, it alerts us that the brakes could have possibly been getting too hot. With this now in mind, we will then check the water content of the brake fluid. If the content was above 1% then the fluid would need to be changed, although this could also be an underlying factor to why the brake disc was in this condition. Without removing the wheel and gauging the thickness of the brake pad or brake shoe, most inexperienced people would not realise that a brake disc that had a blue tinge to it and a high content of moisture in the brake fluid might be a manifesting problem.
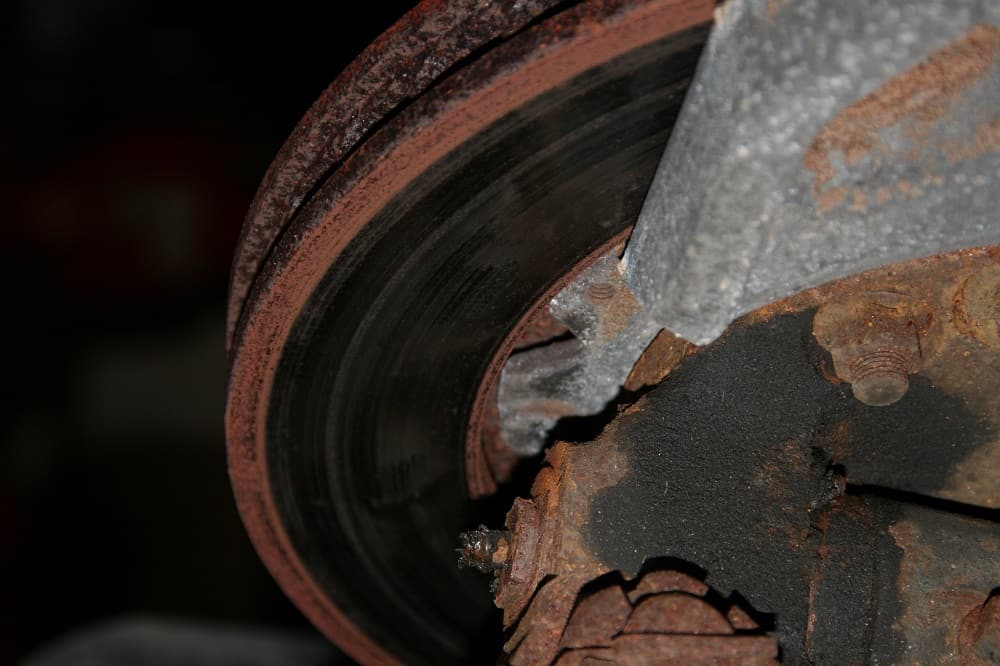
The discoloured brake disc
If the vehicle should we say is 10 years old and only covered 17,000 miles, some inexperienced people would assume with that mileage on the clock the brake shoes would be fine and there would be no need to remove the wheels.
When a motorhome has covered such low mileage most owners automatically think this is a positive thing, a motorhome that has sat still for long periods of time can deteriorate quite badly. Take the moisture in the air, for instance, the moisture in the air will attack the brake pad material and cause it to just crumble away. If the road wheels and brake callipers are not removed then this cannot possibly be detected.
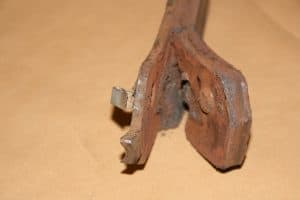
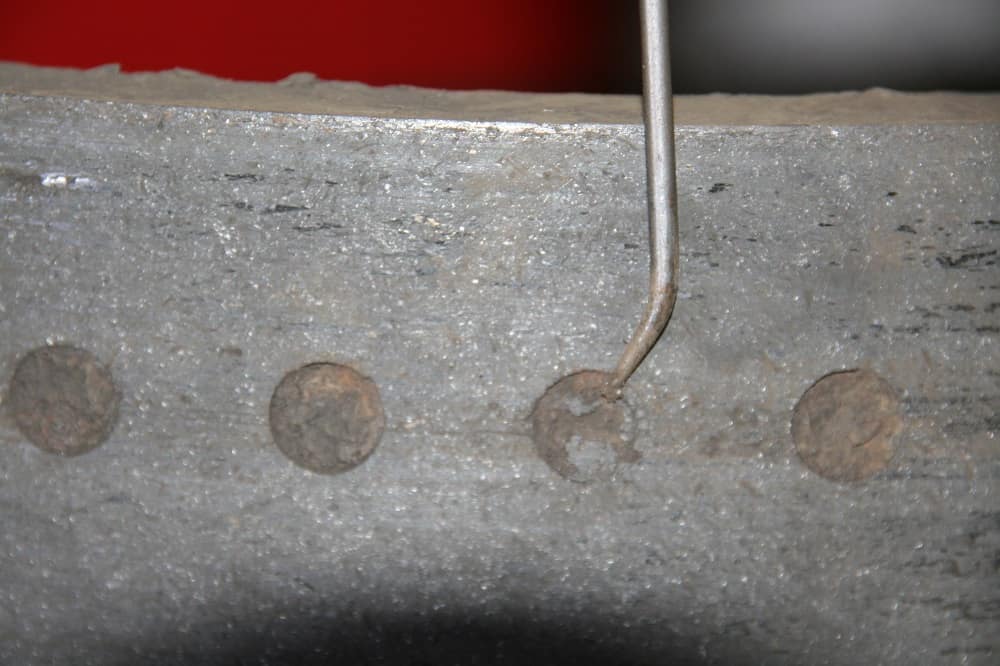
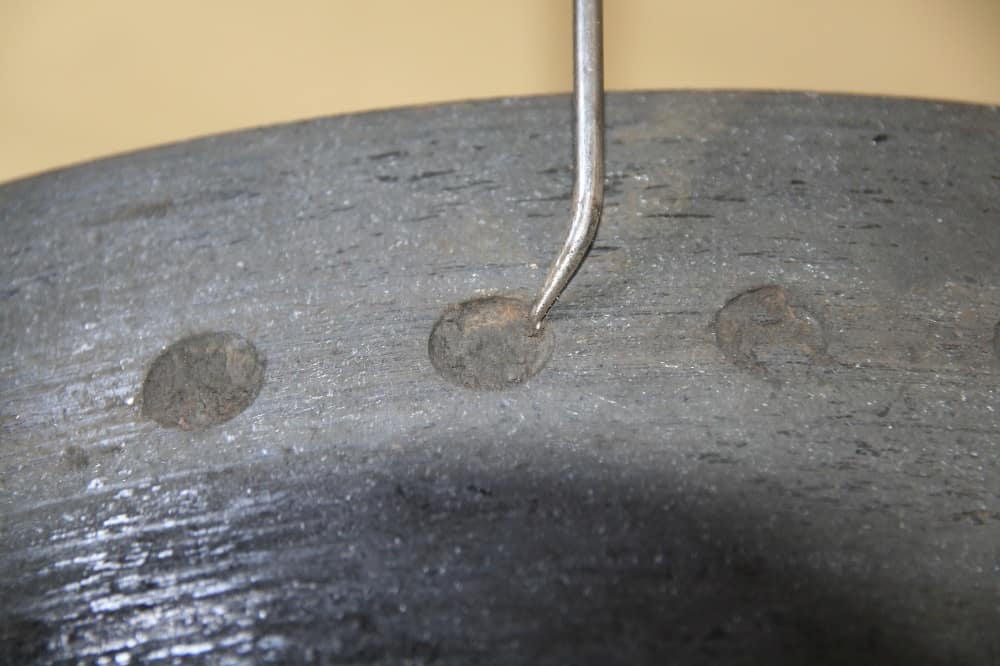
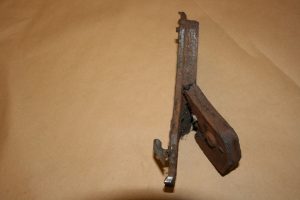 The moisture in the air has caused the metal backing of the brake pad to corrode, which in turn has caused the adhesive to fail between the backing plate and the brake pad material. This problem can happen with the brake shoes found in drum brakes. The metal brake shoe corrodes on the surface the brake shoe is attached to, this corrosion builds up under the brake shoe and forces the shoe upwards putting pressure on the brake rivets. If this corrosion gets too severe, the excess pressure on the brake shoe rivets can cause them to come loose. The other problem that can happen is that the corrosion takes place under the end of the brake lining lifting the lining and causing it to crack and break off.
Another reason to remove the brake drums is that the brake dust that is generated due to the brake lining wear will lie on the surface of the brake shoe. This dust falls into the brake shoe rivet holes, the build-up of dust then becomes compressed between the brake shoe and the drum. In extreme cases, this build-up of dust in the brake rivet holes becomes higher than the brake lining itself. The result of this is the braking efficiency is lowered. What needs to be done next is to remove the brake dust from the rivet holes.
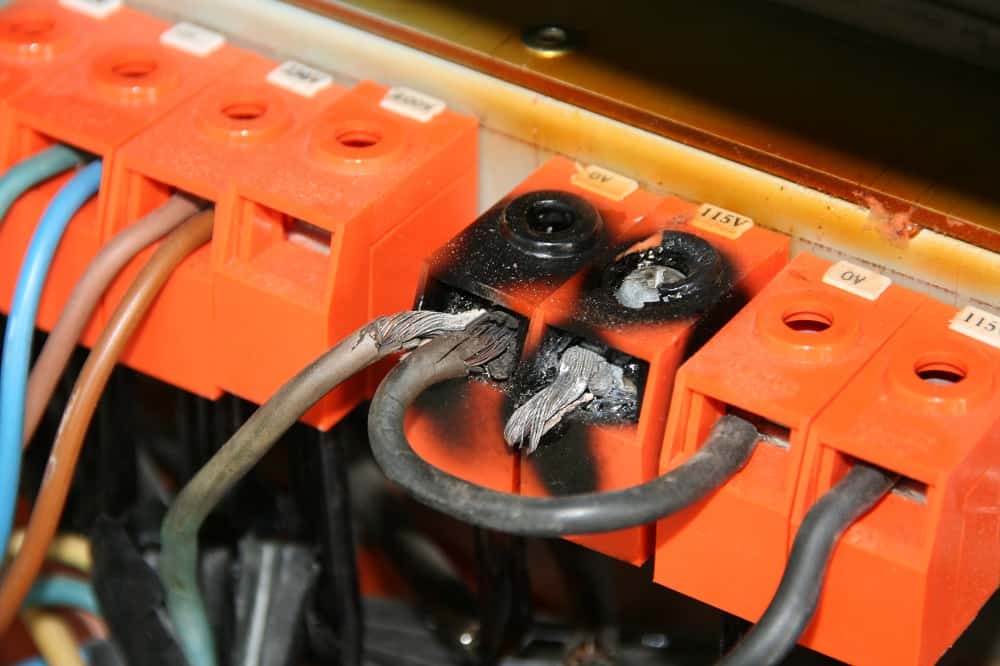
American RV motorhomes with air brakes have a device called an air dryer. On top of the air-dryer is a canister braking, like a larger oil filter. This canister needs to be changed every few years. The purpose of this canister is to house desiccant. This desiccant is housed in a textile bag which with age will deteriorate, allowing the desiccant beads to enter the air brake system causing mayhem with the air valves. Even if this didn’t happen, once the desiccant passes its useful life it cannot absorb any more moisture. This moisture will then enter the braking system, in winter this moisture could then freeze.
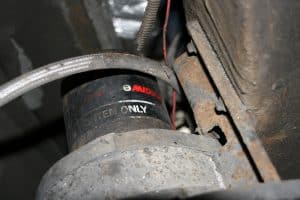 In the picture, you can see the desiccant filter has not been changed for some time.
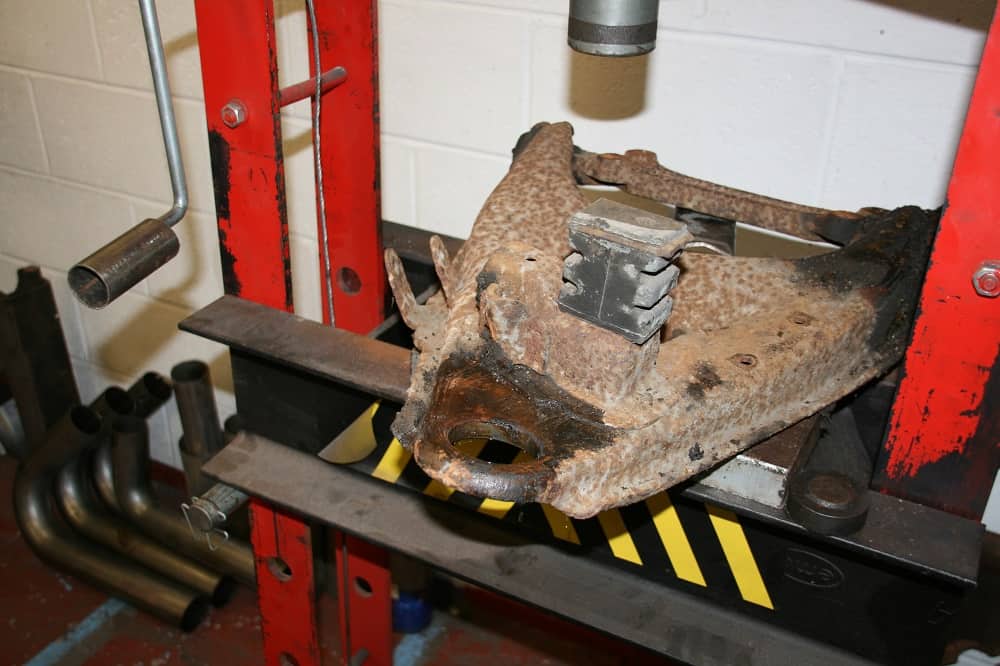
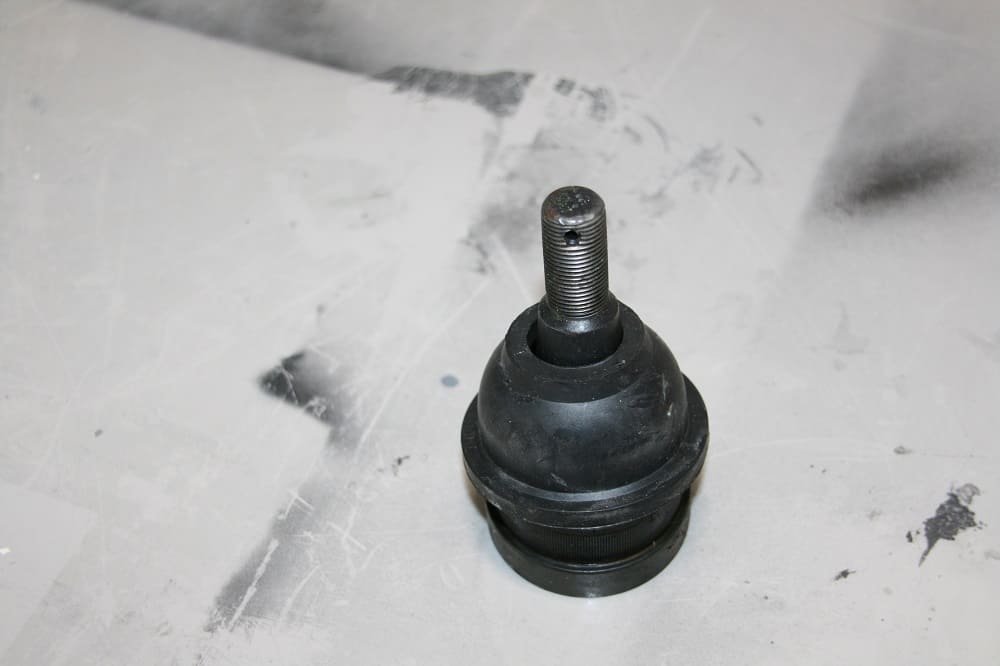
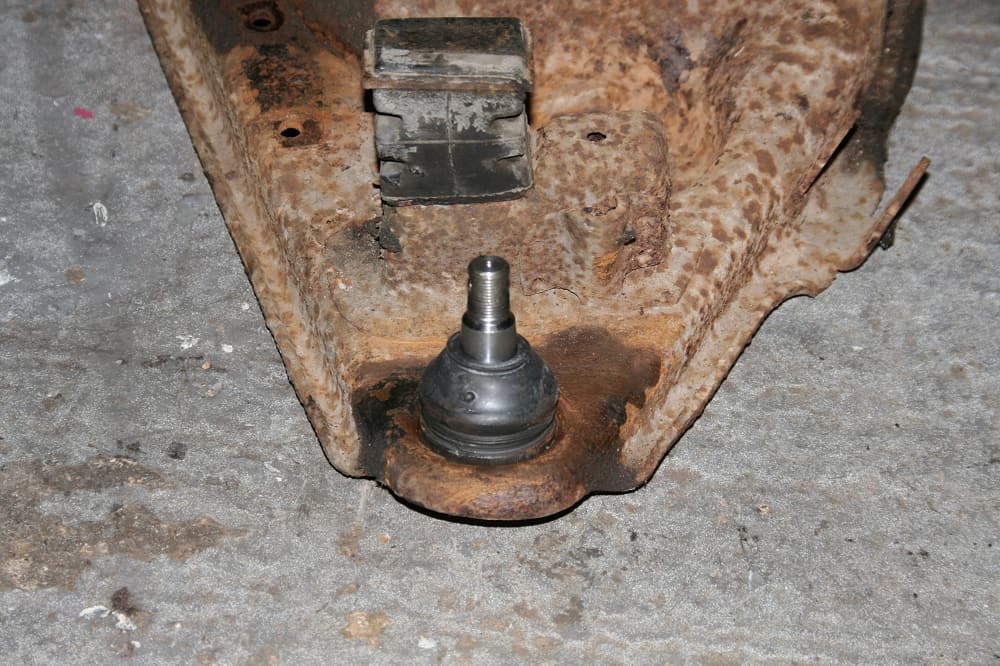
American RV motorhomes need a class 4 MOT once they become three years old, the class 4 MOT is identical to the test that is carried out on the family car. Now the MOT requirements have changed, a lot more checks have been included, one that has now been included is ball joint dust covers. Most of the modern day cars have sealed ball joints, this means they have no way of greasing them. Once the dust cover is holed the water can enter the ball joint and the small amount of lubrication used will quickly be diluted and accelerate the wear process of the ball joint.
The later workhorse chassis RV motorhomes did use sealed bottom and top ball joints so I would tend to agree with the VOSA theory although the older version used a greaseable ball joint, which to my way of thinking should not apply because if regularly serviced any water entering the ball joint dust cover would be forced out when re-greasing the ball joint. The only saving grace is that you can replace the dust covers without having to purchase another ball joint. I have changed a fair few of the sealed bottom and top ball joints when they have been well worn. It’s not worth spending the time to remove them from the stub axle to replace the rubber boot because the wear process is quickly accelerated when water is allowed to enter the ball joint cup and ball.
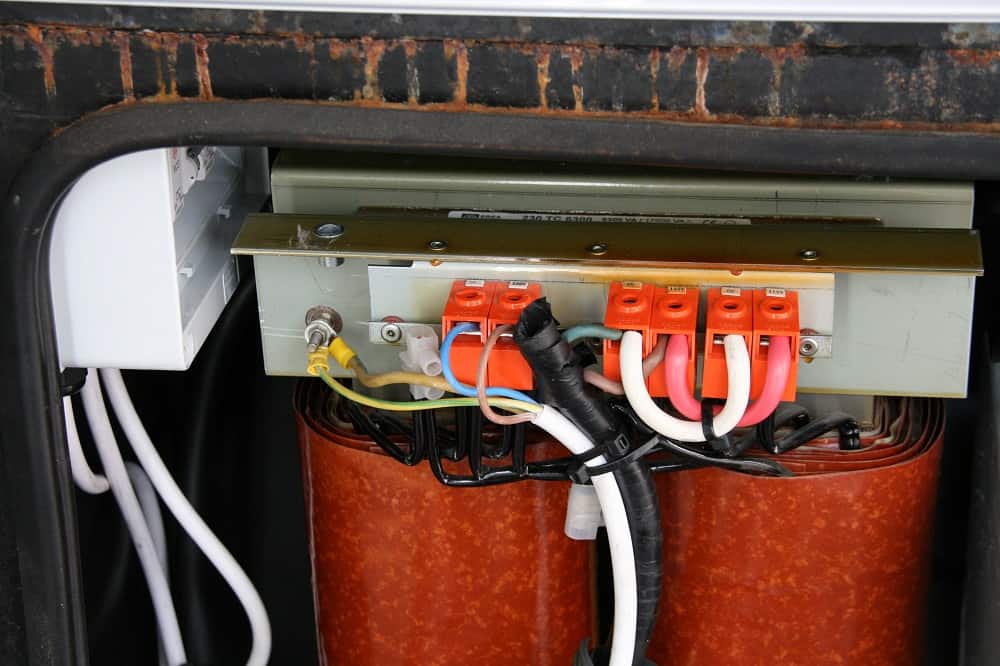
Other items LAS check on the service can save lives. The amount of 230-volt electrical problems we encounter that are down to lack of knowledge is quite frightening. Some of this work has been completed by qualified electricians and if that is the case all I can assume is that they are so used to wiring up houses, they are now totally out of their comfort zone. One problem that commonly occurs is the use of the incorrect gauge wire (thickness). This tends to be a common problem when wiring up transformers, what happens is the same gauge wire is used to feed the transformer as to exit the transformer.
Let me explain – If you are lucky they might use 1.5mm diameter flexible cable, more often than not they go for rigid cable as it is less expensive. The transformer is fed with a 1.5mm cable capable of safely carrying 16 amps at 230 volts, the same diameter cable is used to then exit the transformer. If you half the voltage and double the ampage, this is the formula all electricians should know. The cable exiting the transformer needs to be twice the thickness, in this case, capable of carrying 32 amps safely.
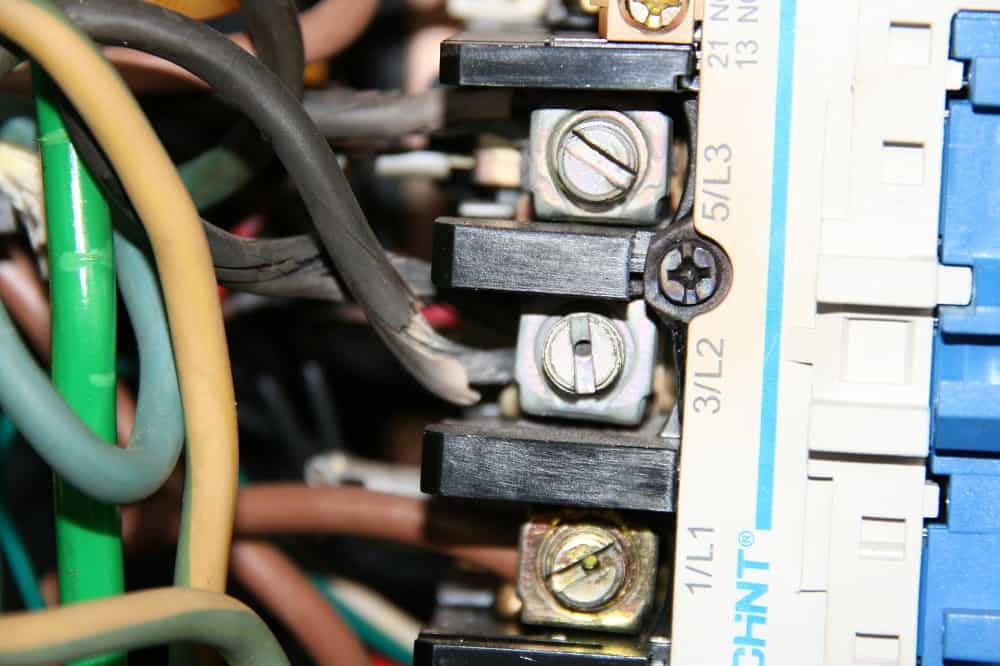
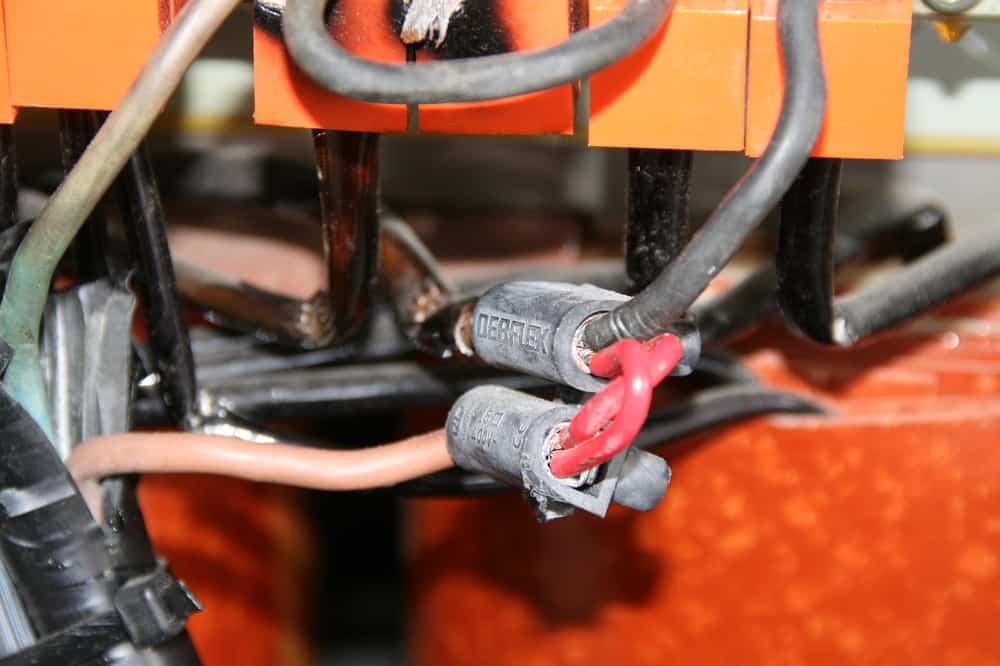
The real hard facts are that the vehicle was plugged into a 13 amp socket in our workshop. As we were testing the air conditioning we smelt burning and traced the smell back to the transformers.
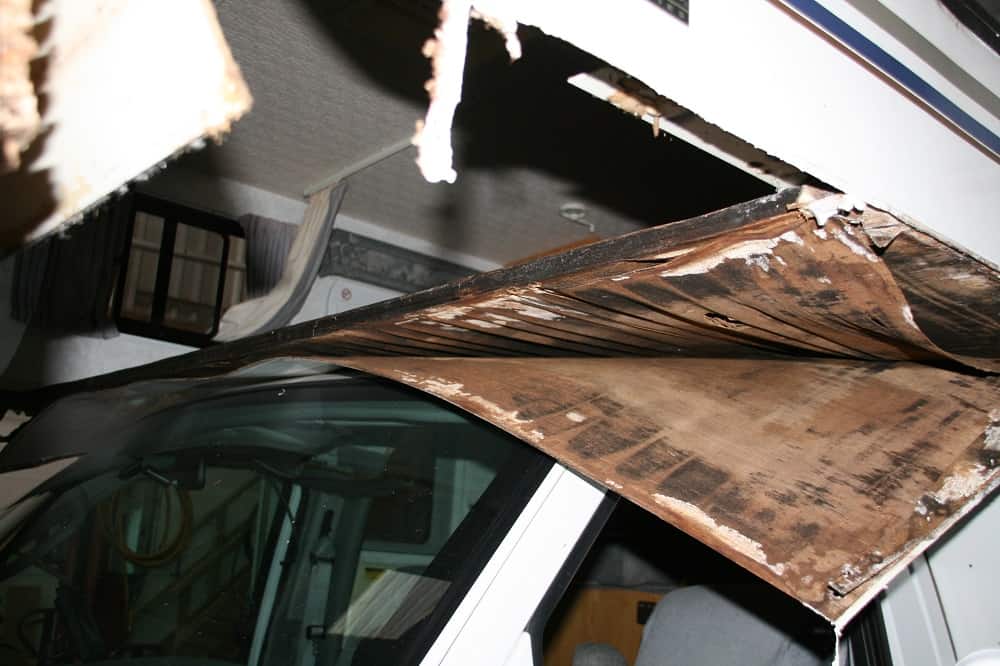
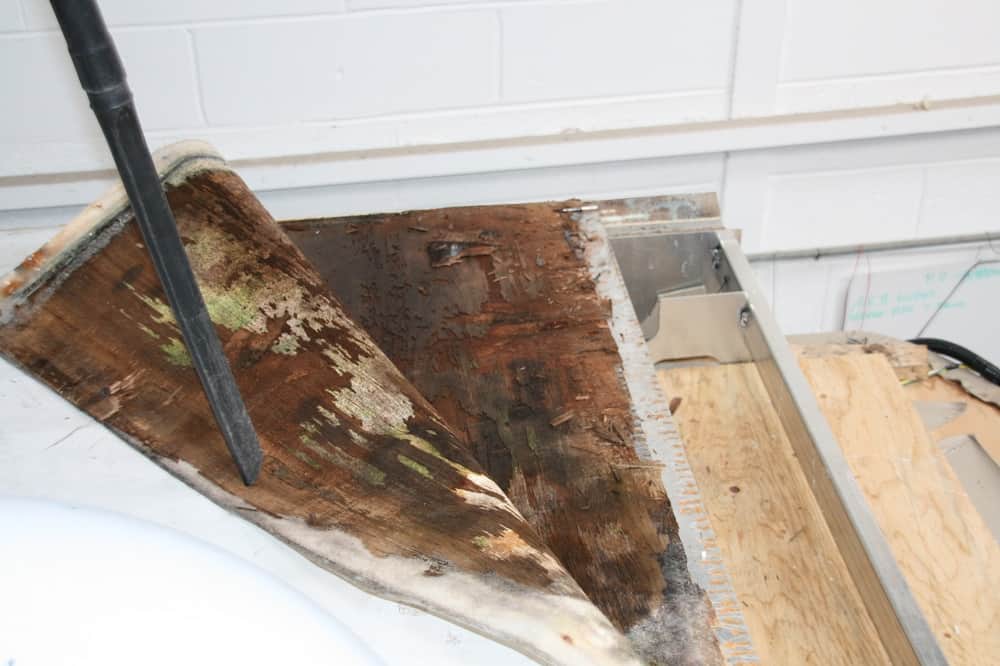
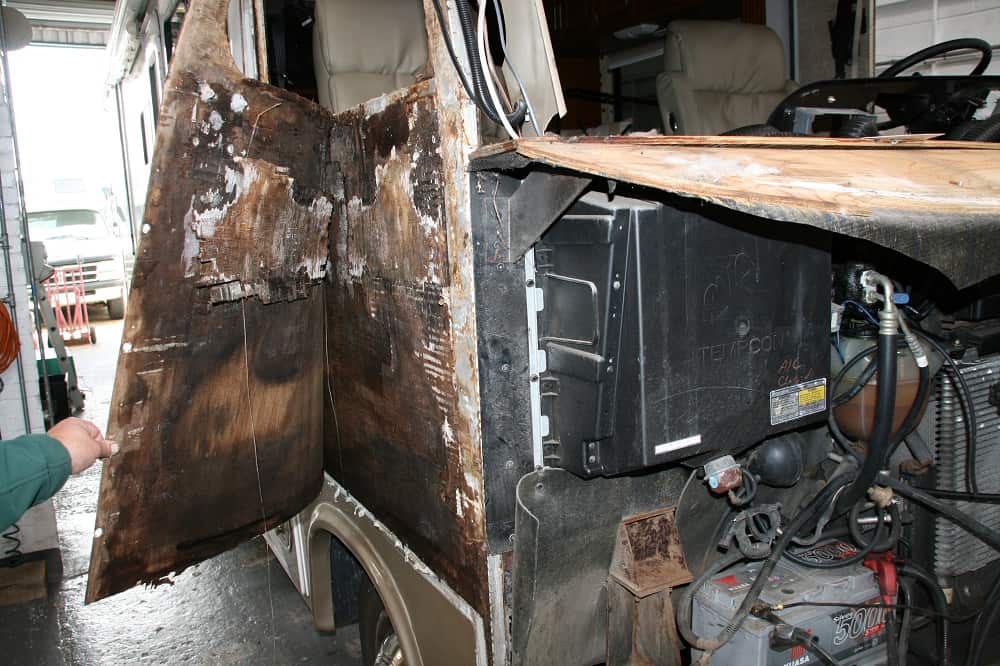
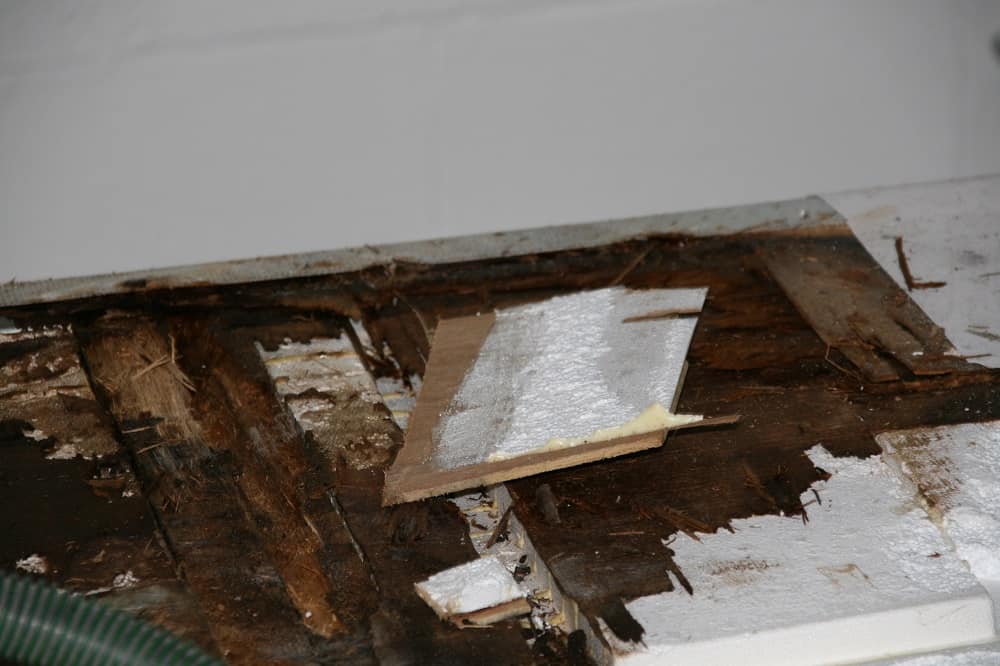
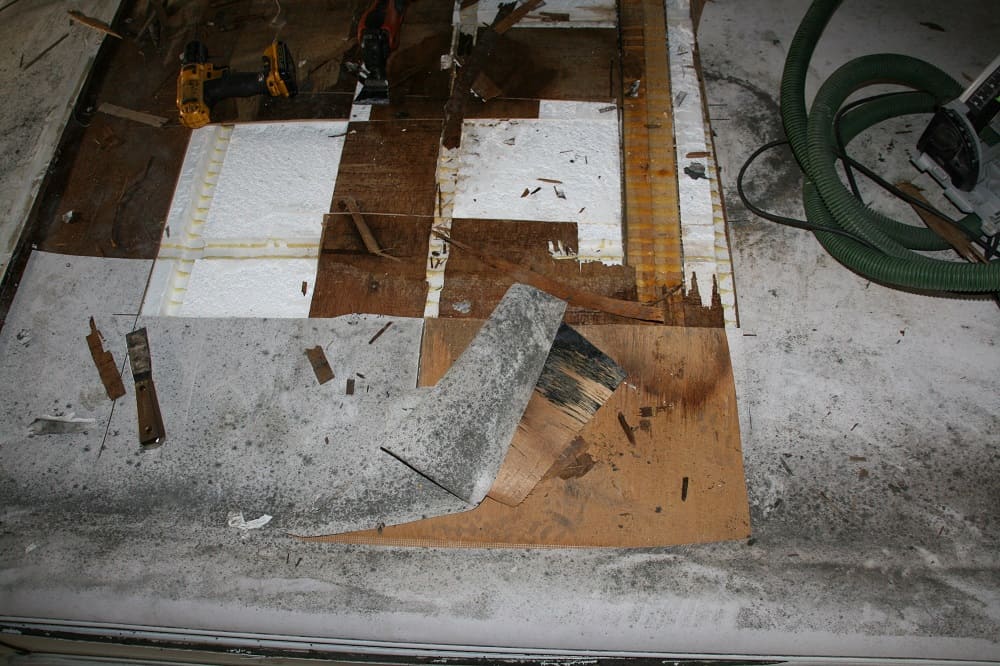
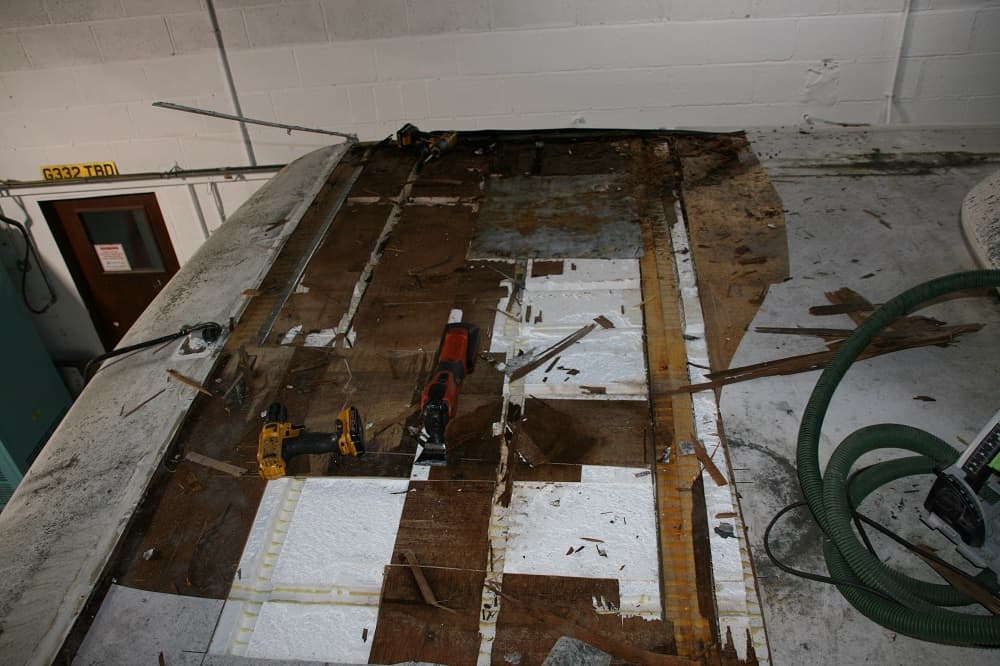
Damp testing inside the vehicle is also very important. If these problems are detected early then a re-seal of the roof to stop the water ingress can be done and big problems and expense can be avoided.
Other problems that can occur and can in a lot of cases be avoided are when owners tell me their vehicle has not covered many miles quoting “I have only used it twice this year so you can inspect the RV then take it for an MOT”, then the following year I get the same request. On the third year, I might get “You better give the RV a service as I haven’t had a service for a while.” This could mean the vehicle has not had a proper in-depth inspection for a total of three years.
In a real-time case this happened and when we inspected the roof we found that something had impacted the TV aerial which had then damaged the seal between the aerial and the roof, water had then leaked under the TV aerial. If the vehicle had been serviced on yearly intervals the damaged seal would have been spotted and then re-sealed preventing any further damage. Unfortunately, this was not the case, as you can see in the images the water has spread under the rubber membrane. The damage was severe enough to warrant replacing the wood and some of the membrane.

Another check that is carried out on a LAS service is to check the air conditioning gas pressures. A vehicles air conditioning system that is driven off the engine will lose a small amount of gas each year. This gas will escape from the pipe joint and mainly from the compressor seal. Some customers when informed that the system requires some gas reply “We don’t use the air conditioning because the weather is too cold!” The simple fact is the air conditioning system removes water from the air when working correctly, this is a huge advantage when you need to demist your windscreen. For those of you that are new to RV, motorhoming might not realise what happens on a damp rainy day. It is very difficult to get rid of the condensation from the inside of your windscreen without the addition of air conditioning due to the size of an American RV motorhome windscreen. The air conditioning is automatically applied when you direct the heater motor air flow to the windscreen. Taking into account all of these facts I personally think by adding some more gas to the system is more about safety than comfort.
Batteries
Checking the batteries is also included in the LAS service. If the batteries have a removable top then we will check the water level, we will also look for any distortion of the battery before topping them up with distilled water. The battery voltage of the fully charged batteries are noted, this can give us a good indication of the condition of the battery.
One of the main problems found is not with the batteries but with the battery charger. Some of the original battery chargers will only charge the batteries at 13.6 volts which can be one of the main causes of sulphating and premature failure of the batteries. To charge the batteries to the optimal and get the best from them the charge voltage should be as near as you can to 14.4 volts. This will give you 100% charged battery, unlike the 13.6 volt which will only give you a 75% charged battery as well as a reduced battery life due to the sulphation.
Tyres
On the LAS service, we will also check the tyres when the wheels have been removed for brake examination. There is more to a motorhome tyre than the depth of the tread. Tyre ageing is a big issue with any vehicle that is not used frequently or that has been left in storage. First of all, we take a look at the date stamp, the four-digit tyre code is usually found in a window on the tyre wall.
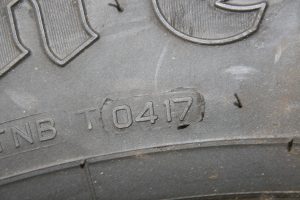
In the example above you can see 0417. The first two digits of the code represent the week of production during the year (from 1-52), the second two digits represent the year of manufacture. In this case, the 04 stands for the fourth week of the year whilst the 17 is the year that they were manufactured. If your tyres are printed with only a three digit number it means that the tyre was manufactured before the year 2000 and should be replaced as soon as possible. Tyre ageing can be identified by cracks around the side wall of the tyre. This is brought about when ultraviolet light from the sun oxidises the rubber causing it to dry out. While tyres do contain anti-oxidising chemicals which do significantly slow down the rate of ageing, this wax-like substance which is often referred to as soap is only released when the tyre is in motion. This explains why a tyre that is badly cracked is often light grey in colour. If the tyre is not used frequently, it will age more quickly making it in some cases unroadworthy. This is why at LAS we carry out these checks because a lot of RV owners will assume that because their vehicle has low mileage then the tyres will be good. Looking at the tread depth would confirm this. It is not until you start to look carefully that the situation begins to change, owners assume that the tyre is in good condition if it has got plenty of tread and does not realise this can become a safety issue for you, your family, and other road users.
Tyre Pressures
American RV motorhomes have a data plate attached to the inside of the body, this is usually positioned on the wall above the left-hand arm of the driver’s seat. On this plate, there will be data such as the chassis number, body number along with other useful information. Somewhere in the middle of the plate, you will find the recommended tyre pressures.
Here are a couple of points about the recommended tyre pressures.
1. The recommended tyre pressure would only be related to the original tyres, not the tyres you have fitted now.
2. Americans do not have many roundabouts or corners which allows them to run on lower tyre pressures as tyre shoulder wear is not an issue.
3. Americans do not have to suffer the potholes in the roads as we do, again they can run on lower tyre pressures.
First of all look at all the tyres to make sure the tyre pressures stamped on the tyre wall are the same.
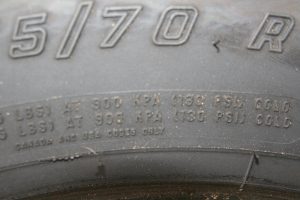 The tyre pressure stamped on the tyre wall. Then we look at the maximum load rating of the tyre, checking that the load rating is adequate for the motorhomes gross axle weight rating (GAWR).
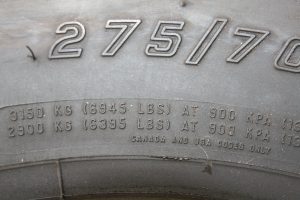 The top number of 3150 kg relates to a single tyre (front) and 2900 relates to dual tyres (the rear).
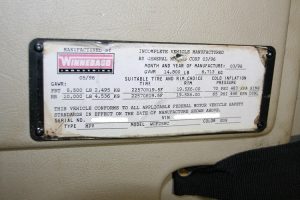 On this data plate, we can see that the front gross axle weight rating is 2495 kg and the rear is 4563 kg. On a LAS service, we ensure that all the tyres that are fitted will be capable of carrying the vehicle’s weight.
A safety warning regarding the data sheets, some of the American RV motorhome data sheets are out of date.
 On the above image, the tyre pressures are quoted as the single (front) 70 psi and dual (rear) 65, this plate relates to a motorhome built in 1996.
When the motorhome came from the factory it would have been supplied with Michelin tyres. The maximum tyre pressure for a Michelin tyre size 8R195 would have been 80 psi, this Michelin tyre changed around 2000 to 90 psi maximum.
As things moved on owners started to fit 225 x 70 x 19.5 tyres to the same vehicle tyre rims, this now makes the vehicles data plate incorrect. To make things worse the Michelin tyre, being a very good tyre became very expensive, let’s face it you don’t need to spend a fortune on a tyre to watch it degrade the same as a tyre half the price.
The replacement for a premium Michelin is a budget tyre unless you are covering 20,000 miles a year or more I would stick with a premium brand tyre. Budget tyres will give a little harder ride with most having a maximum tyre pressure of 110 – 120 psi. The tyre pressure on the tyre has no relation to the data plate anymore. If owners are not aware of this they could be running their tyre pressures far too low for safety, this is why on the LAS tyre inspection sheet previous and present tyre pressures are noted along with the tyre tread depth of the middle and two outer edges. These measurements are carried out with the wheels removed from the motorhome to enable us to inspect the tyres easier, then if necessary rotate the wheels from front to back or left to right.
Checking the Chassis components
The LAS service includes a chassis and lighting inspection that is above MOT standard. An MOT inspection that is carried out at an MOT station is basically a snapshot of what condition the vehicle is in on the day of the test. Corrosion inspection is basically valid for a month.
At LAS we are inspecting the vehicle with a view to it being safe until the following year. For instance, if a lower ball joint has lift in it, we will know what the maximum the manufacturers will allow and armed with this information we can make the decision to leave it or to replace it.
If you combine your MOT with your LAS service then there is no need to have another inspection. The reason that LAS will not present a vehicle for an MOT test without first inspecting it is because morally we could charge you for the re-test, and who are the RV motorhome experts LAS or the MOT station?
On the service, the steering ball joints, brake pipes, kingpins and suspension components are checked and all greased. All items that are inspected on an MOT inspection are also inspected on a LAS service, even the emissions.